
 Resources
 Campus Life
 Just for you


 My Canyons
  Canvas

Canvas & Zoom Student Guides
Access Your Course in Canvas
To log into Canvas, go to: coc.instructure.com.
- The username is your MyCanyons email address: "username@my.canyons.edu"
- The password is your my.canyons email password
 Need Help with Canvas?
Contact Canvas Support via Zoom, Email or Phone
For help with Canvas via Zoom, drop by the Canvas Student Support Zoom Room open Monday & Thursday 10am-4pm; Tuesday & Wednesday 10am-6pm; Friday & Saturday 10am-3pm
- Email cvsupport@canyons.edu
- Call 661-362-3344 (Mon & Thurs 10am-4pm; Tues & Wed 10am-6pm)
Contact Canvas Support 24/7 via Online Chat or by phone: 1-877-889-9052
Get to Know Your Online Classroom
If you are new to College of the Canyons, you may find yourself using Canvas or Zoom for the first time. Explore the guides below to learn how to navigate and be successful in your online classroom.
Learn how to use Zoom

 Join your instructor and classmates in Zoom
Your instructor will share the Zoom meeting link with you in Canvas and/or via email; click on the link to join the meeting.
If the meeting link requests that you register, you may need to first create a free Zoom account using your COC My Canyons email address. To sign up for your own free account, visit the Zoom sign-up page and enter your email address. You will receive an email from Zoom (no-reply@zoom.us). In this email, click Activate Account. You can then register for the meeting with your new account.
 Related Zoom Video Guide
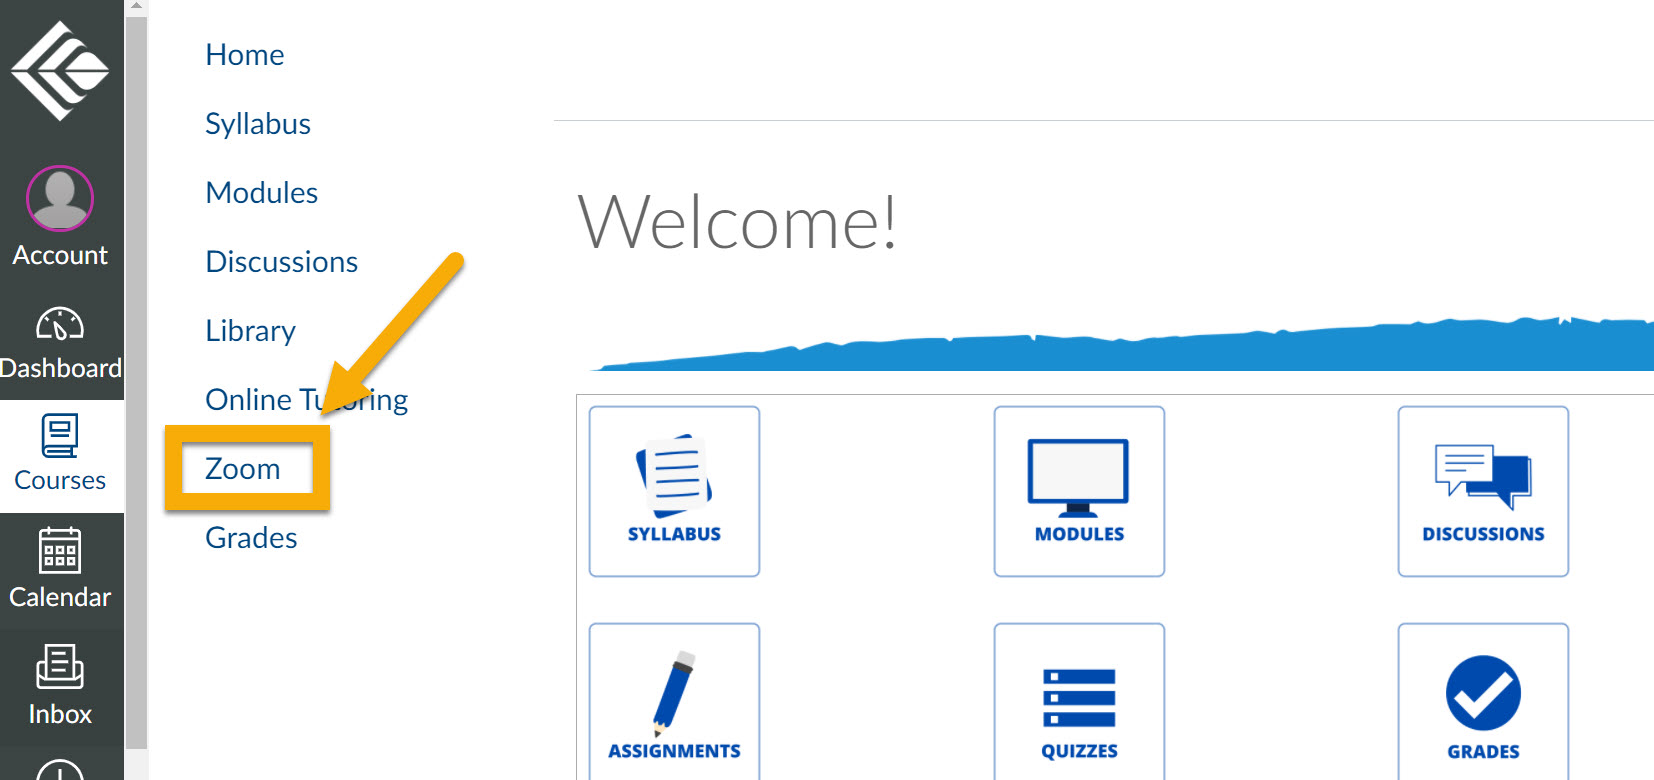
Access Zoom from Canvas (on a computer)
In Canvas, you can access Zoom in your course navigation menu.
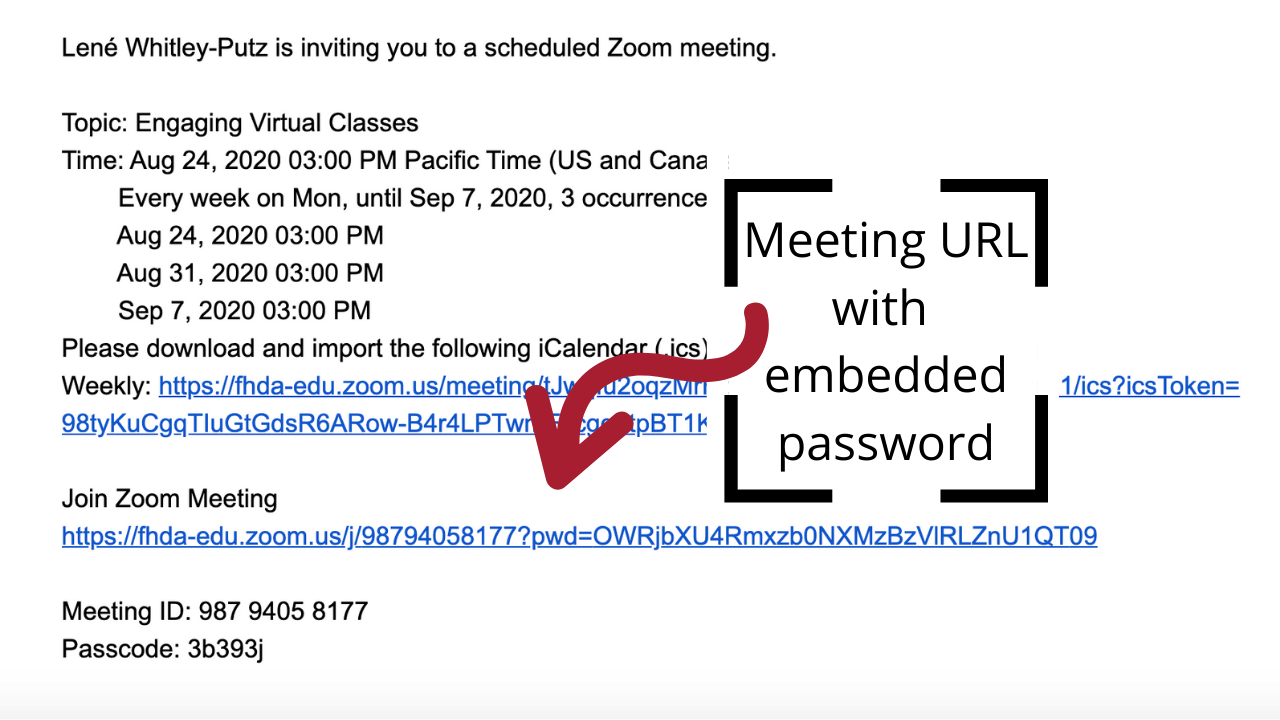
To get started with your first COC Zoom class meeting, you should receive a meeting link. This can happen one of two ways: By email/calendar invite, or by a link in the Zoom section of your Canvas course.
Examples of two types of COC Zoom Meeting invite links
1. Select on the link your instructor provided, either by email, Canvas Inbox, or an announcement,
2. Or via Canvas by selecting "Zoom" in the course navigation menu, and then selecting the blue "Join" button.

If this is your first Zoom session, Zoom will ask you to download the application.
- Download the Zoom application onto the device you will be using to participate in class.
- Ideally, this should be a laptop, desktop, or tablet, and not a smartphone. Zoom does exist for smartphones, but it will be very difficult to see the slides that your instructor presents on that small of a screen.
- When prompted, select "OK."
That's it! You will now be entered into the Zoom Class.
Access Zoom on Canvas (from a phone)
You can also access Zoom on your phone, by getting the Canvas Student app and the Zoom app:
Related Zoom Video Guides
Will I be required to have my camera on during my class meeting?
When you join an online meeting hosted by your instructor, you will have several options for how to participate, including using your camera, audio, and chat features. In most cases, you will have the option to turn your camera on or off. However, for certain subject matters, and occasionally for online proctoring, full audio and visual participation will be essential to instruction. In this document, we will explain your rights as they pertain to the use of cameras in an online class.
Why might I choose to turn my camera on?
Having cameras-on can benefit and enhance the class learning environment in a number of ways:
- Instructors are better able to gauge student reactions, request feedback, and check for understanding.
- Classmates may be able to more easily form friendships and study groups and engage in a livelier classroom experience.
Why might I choose to leave my camera off?
Students may choose to leave their cameras off during class for various reasons, including:
- Not having a private area in their home to attend online class, so that the privacy of family members or minors would be compromised.
- Not having access to a camera or reliable internet connection to maintain a video presence during their classes.
- Otherwise feeling uncomfortable being on camera.
For these reasons, College of the Canyons has provided guidance on the use of cameras in class meetings. The California Community College State Chancellor's Office has also issued their legal opinion which strongly disfavors a cameras-on requirement. At College of the Canyons, instructors strive to ensure that your privacy is protected in any online class environment.
Can class meetings be recorded?
You might have heard of the Family Educational Rights and Privacy Act, also known as FERPA. This act protects student records, including recordings of class meetings containing students' names or faces. At College of the Canyons, guidance has also been developed to assist instructors in their use of cameras and recording during live class sessions. This means that:
- Your instructor will ensure that identifiable student information is not included in online class recordings whenever possible.
- If your instructor plans to record an online meeting where you or your classmates will be identifiable (names or faces), they will first request a signed consent form from you. You always have the option to decline to be part of the recording.
- Students may not record or capture images of online class meetings without preapproval from the instructor and classmates.
Where are my legal rights to privacy defined?
The California Constitution, Americans with Disabilities Act, and FERPA outline students' rights for privacy while pursuing their education. College of the Canyons is committed to protecting student privacy, keeping educational records secure, and ensuring that students with disabilities are provided accommodations and protection against discrimination.
Learn how to use Canvas

Log into Canvas at: coc.instructure.com
- Log into Canvas with CanyonsID
- How to login to CanyonsID for the First Time
Your Dashboard
The Dashboard is the first thing you will see when you log into Canvas. The Dashboard helps you see what is happening in all of your current courses.
Change Your Dashboard View
Select the options menu to choose the view of the Dashboard you'd like displayed (Card, List, or Activitiy View).

View or Remove Color Overlay
Select more options, then click on "color overlay" to enable or disable the feature.

Move a Course Card Using Drag and Drop

Change the Color of Your Course Cards
- Select more options from the Course Card.
- Select an available color or type a hex color code into the field.
- Click the 'Apply' button to view the changes.
Add To-Do's to Your Dashboard (in List View)
- In Dashboard List View, select the 'Add' button
- Enter the title, date, time.
- Select the Course that you would like to add the item to.
- When finished, press the 'Save' button to view your new To-Do item.
Related Canvas Guides
Access Your Course
The 'Courses' button in your Global Navigation lists all of your courses in Canvas, including current and past enrollments.
Viewing All Courses
- To access all courses that you are or have been enrolled in, click on the Courses icon in your Global Navigation. Your favorited courses are listed.
- Select All Courses to view all of your current and past course enrollments.

Related Canvas Guide
Adding Contact Methods
In Canvas, you have a default Contact Method. You may add additional contact methods to your Canvas Account. Contact Methods are used to communicate course updates and instructor feedback to you.
Adding an Email Address
- To add more Contact Methods, click on Account from the Global Navigation.
- Select Settings.
- Choose the +Email Address to add another email.
- When finished, select the Register email button.

Adding a Cell Phone Number
- To add more contact methods, click on Account from the Global Navigation.
Select Settings. - Add your cell phone number by choosing the +Contact Method button.
- Add your cell phone number and choose your wireless carrier, the SMS email is automatically entered.
Then select Register SMS.

Setting Notification Preferences
Once you setup your contact methods, you may choose your notification preferences for each of the Contact Methods in your Canvas Account. Notification preferences apply to all Courses that you are enrolled in at College of the Canyons and allow you to choose what reminders you want to receive and how often. You can adjust these preferences at any time.

Related Canvas Guides
- How do I change the settings in my user account (including preferred name)?
- How do I select personal pronouns in my user account?
- How do I add contact methods to receive Canvas notifications?
- How do I add an additional email address as a contact method in Canvas?
- How do I add a text (SMS) contact method in Canvas?
Canvas Student Support
- If you need assistance logging into your course, call 661-362-3344
- If you need help with a Canvas after-hours, you can connect with Canvas 24/7 support via Online Chat
- You can also email your question to: cvsupport@canyons.edu
How to Report a Problem in Canvas
- To Report a Problem, select Help from the Global Navigation menu.
- Click Report a Problem.
- Enter a subject, detailed description of the problem, and then choose from the drop down menu the best match of how the problem is affecting you.
- Then click, Submit Ticket.

Canvas Guides
As a student, you have access to the Canvas Guides. At any time, you can browse the COC Canvas Guides to find information about using Canvas as a student. The Canvas Guides provide images and step-by-step directions for using Canvas.
- To access the Canvas Guides from the Help Menu, select 'Help' from the Global Navigation menu.
- Choose Search the Canvas Guides.
- Click on Canvas Guides from the page that loads, choose Student Guide from the list.
- Then, click on the hypertext describing the topic for which you would like additional support.

Related Canvas Guide

Your Inbox
Message Your Instructor
The Canvas Inbox allows you to easily communicate with your instructor and classmates. To compose a new message:
- Click on 'Inbox'
- Then, click on the 'Compose a New Message' icon.
- Select the course from the dropdown menu.
- Type the name of your instructor, or choose teacher(s) from the list.
- Add a subject and message, then click the 'Send' button.

View and Read Messages
To view and read messages from your instructor and classmates:
- Select 'Inbox'
- Click the drop down menu to sort your inbox by a single course.
- Click again to change back to All Courses.
- Click on an unread message from the list of conversations.

Related Canvas Guides
Your Calendar
The Calendar is a great way to view everything you have to do for all your courses in one place. You can view calendar events by day, week, month, or agenda list. The calendar also includes access to the Scheduler, which is an optional scheduling tool in Canvas.
Turn Course Calendars On or Off
Canvas Calendar assigns a color to each of your courses, as well as to your personal calendar (which is labeled with your name). To enable or disable courses from appearing on your Canvas calendar:
- Open 'Calendar' .
- In the sidebar click the color box next to the name of the calendar to turn a calendar on or off.
- When the color box next to the name of a calendar is empty, the calendar is off and the events and assignments are hidden.

Add a To-Do to your Calendar
- Open the Canvas Calendar by clicking the 'calendar' icon in the Global Navigation menu.
- To add a To-Do item, click on a date in the calendar or select the 'add' icon.
- Then, choose the 'My To Do' tab.
- Enter the title, date, and time (optional) for your To Do.
- Select which course calendar you would like to add the To Do item to from the drop down menu.
- Add additional details if needed.

View Scheduler Appointments
Appointments can include instructor office hours, group presentation time slots, lunch with an alumnus, or other time slots. If you do not see any open scheduler appointments, don't worry, your instructor might not be using this tool.
To find an Appointment:
- In the Calendar sidebar, click the 'Find Appointment' button.
- Select the course in the drop down that you want to search.
- View the appointments available for the course. Faded time slots mean the time slot has been taken by someone else.

To Reserve an Appointment:
- In the calendar, click the time slot you want to reserve.
- The appointment window shows the appointment time, calendar, and details.
- If you want to leave any comments for your instructor, you can type them in the Comments box. Select 'Reserve' to sign up for that time slot.
- Once you have reserved a time slot, the time slot fades in the calendar.
- When finished making reservations, click the 'Close' button.

Related Canvas Guides
Announcements
You instructor may use Announcements to send out important information. You may see recent Announcements on your Course Home Page or in a link in your Course Navigation.
View Announcements (from Home Page)

Related Canvas Guides

Home Pages
The Course Home Page helps you navigate your course and manage your coursework. Course Home Pages can be different from one course to another based on what the instructor has chosen for the Course Home Page.
All Home Page options include:
- A sidebar with a to-do list that shows announcements and up to seven assignments that you need to submit
- Links to Groups in which you are a member
- A recent feedback section where instructor feedback and scores for your graded work can be seen
You can always get back to the Home Page by clicking 'Home' at the top of your Course Navigation.

Related Canvas Guide:
In the Syllabus Canvas tab, assignments and events in the course are automatically populated. Sometimes, you may see the Syllabus is your home page. Or, the syllabus tab may not be used by your instructor at all.
Find Your Course Syllabus
To view the syllabus, click on the Syllabus button in the Course Navigation.

Related Canvas Guide:
Your instructor may organize your course into Modules. Think of a module as tabs in a binder. Each module will have learning materials and activities in an order that is best for learning.
Accessing and Viewing Modules
Select "Modules" from the Course Navigation on the left. If you do not see "Modules" in the Course Navigation, your instructor may have hidden the module list from student view.

Related Canvas Guides
![]() Viewing Your Course Grades
Viewing Your Course Grades
- To view Grades, click on the Grades button in the course navigation. Grades are listed by the due date. You can change the order in the 'Arrange By' menu.
- The Grades page can also test how your final course grade will change if you earn a certain score on a future assignment. These are called 'What-If 'grades.

Related Canvas Guides
The Course Activity Stream shows you important recent activities one course at a time. Recent activities include announcements, discussions, assignments, and conversations (inbox messages).
View Your Course Activity Stream
To see the Course Activity stream, click the View Course Activity Stream button.


There are several areas in Canvas where you are able to open an assignment. The most common locations to view assignments are in the Calendar, Modules, or the Assignment Index.
Assignment Details
Click the name of the assignment to view the details of an assignment.

Assignment Due Dates

Related Canvas Guide
Canvas allows for different Assignment submission types, including:
- File Upload
- Text Entry
- Website URL
- Media Submission
Submission options will show up below the instructions once you click the "Submit Assignment" button. One option may be to upload a file (see below). You can upload a file from your computer, or you may also see the options to submit a file from your Google or Office 365 drive.
Uploading a file to an Assignment
To upload a file to an assignment:
- Select the "Submit Assignment" button.
- Select "Choose File."
- Find your file in the pop-up window.
- Select "Open," then click the "Submit Assignment" button again.

To upload multiple files, click on "+Add Another File." There is also a space to leave a comment for your instructor. Assignments can be re-submitted until the last availability date that your instructor has set for the assignment. Once submitted, you cannot delete your submission.
Text Entry Assignment
To complete a Text Entry Assignment:
- Select the "Submit Assignment" button in the top-right corner of the screen.
- Select the "Text Entry" tab.
- Click in the space below the Rich Content Editor bar and begin typing.
- Enter any submission comments (note to the instructor) if needed/desired.
- Select "Submit Assignment" again to submit.

*Note: To avoid loosing your work, it's a good practice to first complete your work in a saved file such as a Word Document, and then paste into the Canvas Rich Content Editor when ready. This way, if you lose internet connection in the middle of submitting your assignment, for example, your work will not be lost, as you'll have a saved back-up in Word or other online document storage.
Related Canvas Guides
- How do I view Assignments?
- How do I submit an online assignment?
- How do I know when my assignment has been submitted?
- How do I download assignment submissions from all my courses?
- How do I upload a file as an assignment submission?
- How do I upload a file from Microsoft Office 365?
- How do I upload a file from Google Drive?
- How do I enter a URL as an assignment submission?
Your instructor may include a rubric as part of your assignment. A rubric is a tool instructors use to grade assignments. As a student, you can use the rubric to check your own work and assure your assignment meets all of the requirements in the rubric. If your instructor includes a rubric, you will be able to see the rubric displayed when you view the assignment.
Viewing a Rubric
- Click on the name of the assignment from the Assignments list or Modules list.
- The assignment rubric is shown below the assignment instructions.

Related Canvas Guides

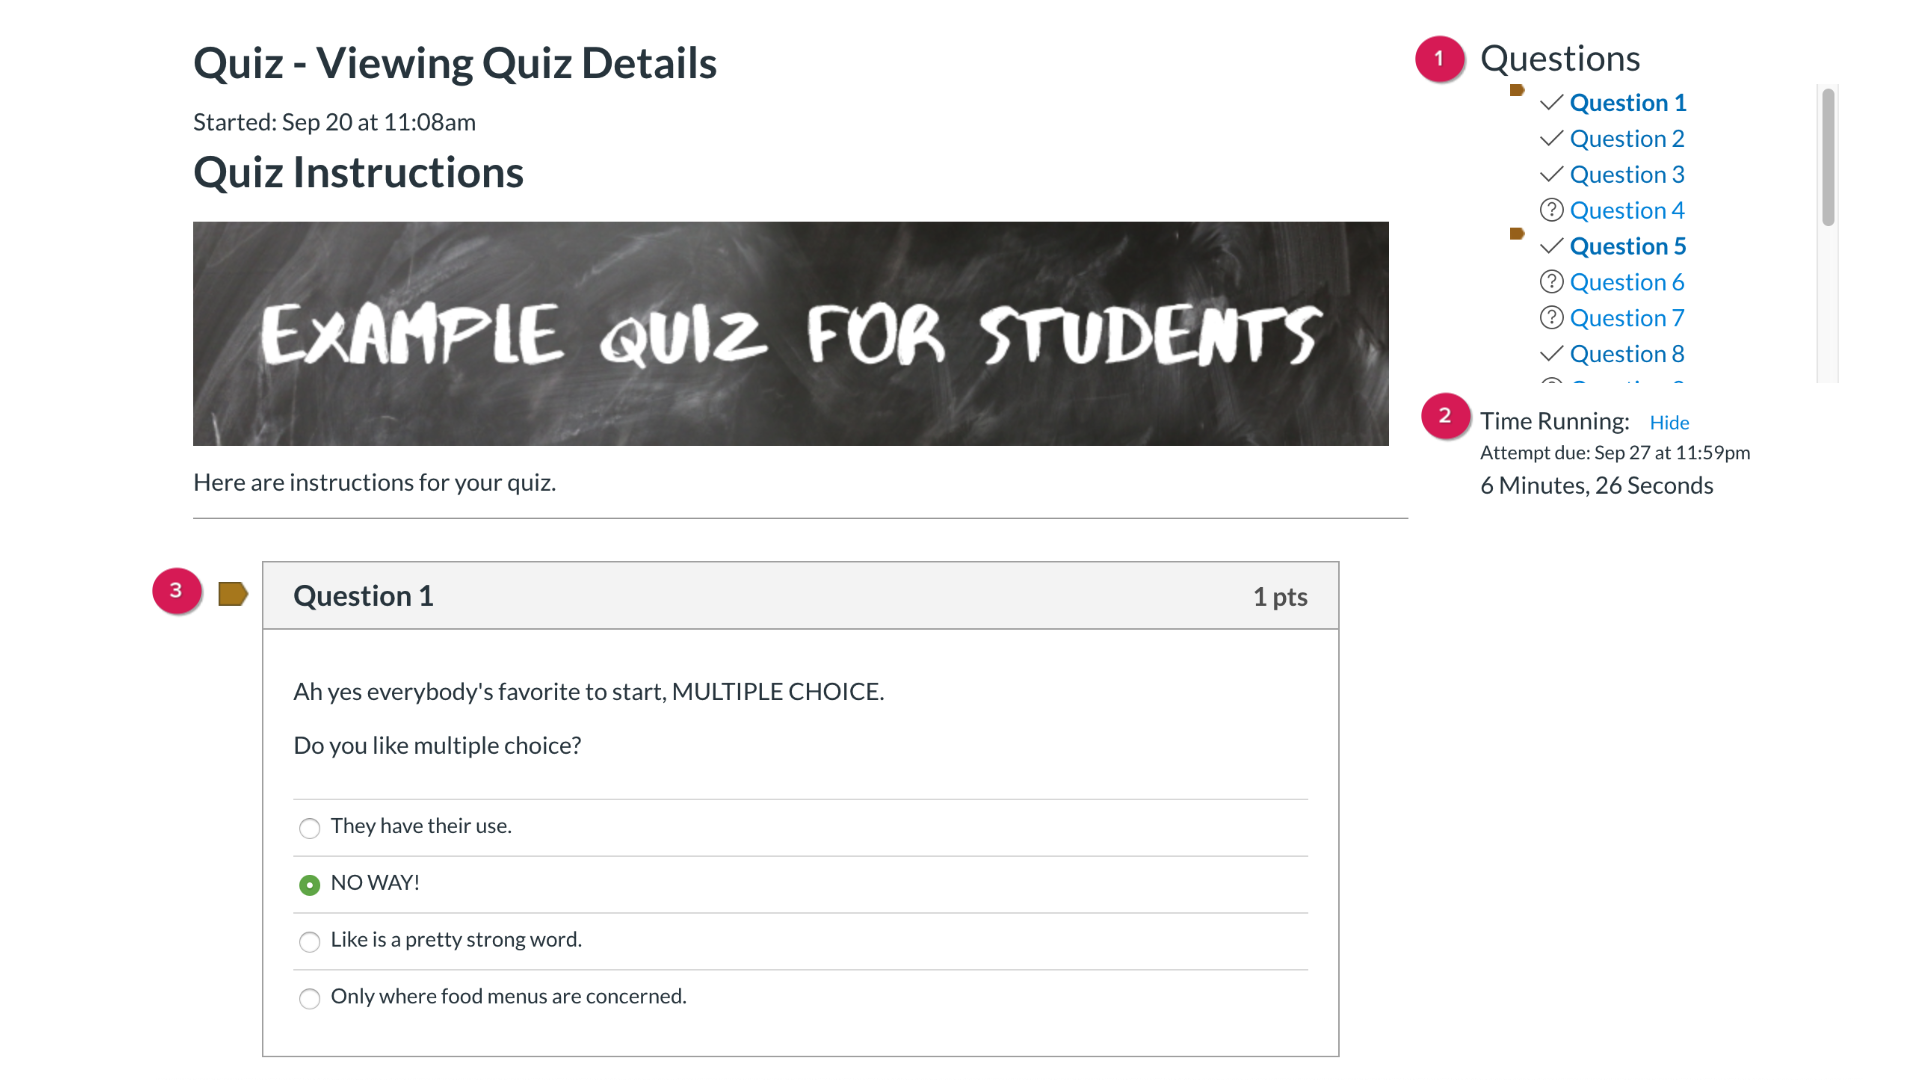
Accessing a Quiz
You can identify a quiz in Canvas by the rocketship Quizzes icon. To open the quiz, select the name of the quiz.

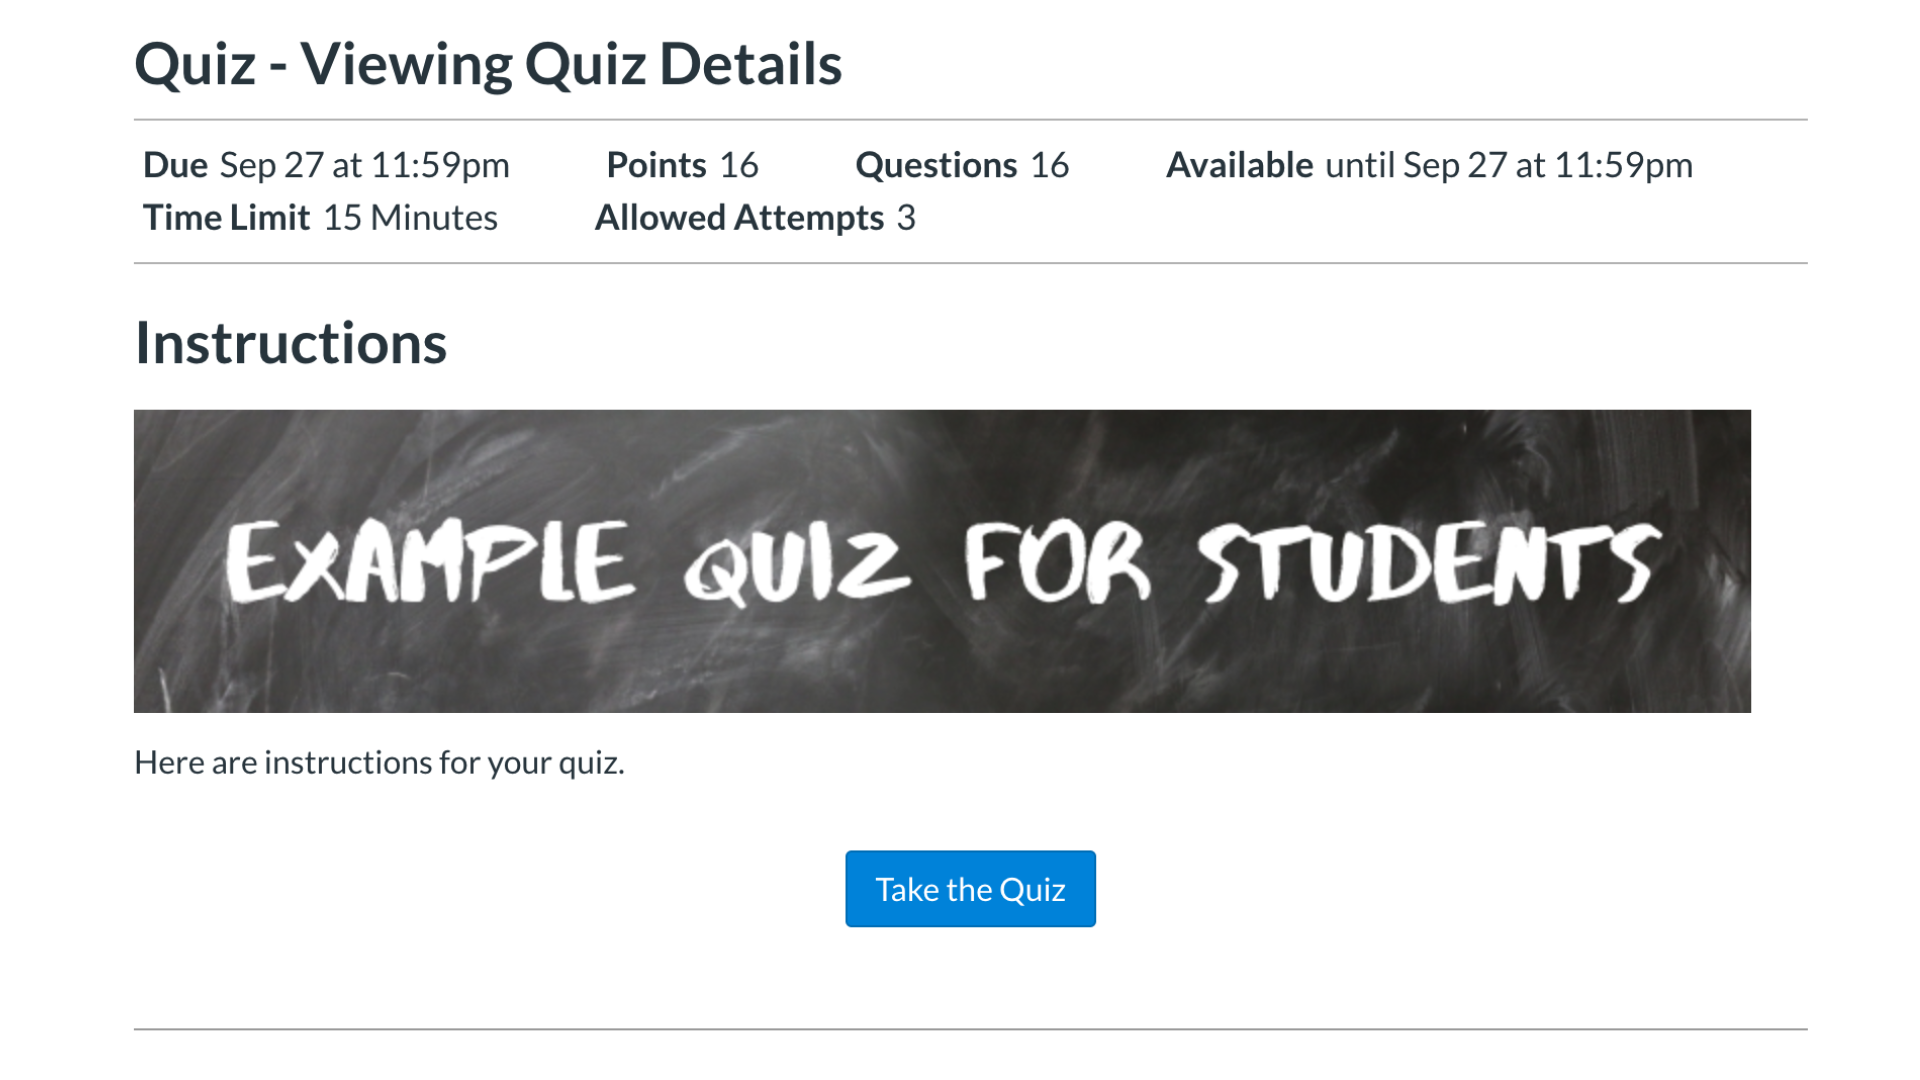
View Quiz Details
Once you open a quiz, (and before you begin it) take note of the quiz details, including:
- Due date
- Points
- Number of questions
- Availability dates
- Instructions
- Time limit
- Attempts allowed
To begin a quiz, click on the "Take the Quiz" button at the bottom of the quiz details screen.
 Quiz Tips
- Timed quizzes must be completed in one attempt.
- You can keep track of your quiz time using the Quiz Timer.
- If you open a new window or you close the quiz, the timer does not pause.
- Your quiz is automatically submitted once the time limit has been reached.
Related Canvas Guides
Viewing Quiz Results

You can easily reply to any discussion. However, the reply option may vary depending upon how your instructor set up the discussion. Discussion replies can be edited or deleted, as long as your instructor has not restricted this setting in your course.
Before submitting a reply for a graded discussion, you may want to review all discussion information, such as the graded discussion rubric, if any.
Related Canvas Guides
Your instructor may add a grading rubric for your class discussion. To view a discussion rubric:
- In your Course Navigation, click the Discussions link.
- Click the name of a graded discussion to open it.
- Click the Options icon (three stacked dots) and select the Show Rubric button. Note: If the Show Rubric button does not display, there is no rubric for your discussion.
Related Canvas Guides

In the global navigation and in the course navigation there is a link to view grades. The list of classes you are currently enrolled in will display. Click on a course to see a list of all grades for that individual course.
Related Canvas Guide
For more information, see How do I view my grades in a current course?
Once an assignment has been graded, you can view your instructor's feedback, annotations, and comments by clicking on the assignment inside of 'Grades'. See steps below:
- In your Course Navigation, click the Grades link.
- Click the title of an assignment.
- Click the View Feedback button.
- You will then be able to view the feedback and annotated comments from your instructor
Related Canvas Guides


Finding Your Group Workspace
You can see the current groups where you are enrolled using the Global Navigation Menu. If you do not see any groups listed, you have not joined a group or been enrolled in a group by your instructor. Previous groups are listed under the Previous Groups header.
Moving Around the Group Workspace
Use the group navigation menu to access Pages, Files, Announcements and Discussions. The People tab will show you who's in your group (in case you forget a name or need an email address).
The Canvas Student App is available for Android and iOS. Some features within the Student App vary by version and device. Check the Canvas Mobile Guides for device-specific details:

- After opening the app, you will see the Student app landing page. The landing page displays previously used login credentials that you can use to log in.
- If this is your first time logging in, locate College of the Canyons by tapping the Find my school button.
- Enter "College of the Canyons" or "coc.instructure.com" in the search field.
- On the login page, enter your email and password. Then tap the Log In button.
- After logging in to the Student app, you will see your Dashboard, which displays your courses and groups. By default, your favorite courses are displayed.
- You can navigate to areas of the Student app by using the Navigation Bar at the bottom of the screen.